
I received my charter issue of Christopher Kimball’s Milk Street Magazine early January. I’m in Norway, so it was a bit delayed. Apparently, others received their copy in November. No matter. Its arrival was fortuitous. I had already removed the few magazines that had trickled in since Halloween and I was running out of food. Meal planning was inevitable. I sat down and read Milk Street cover to cover. I had a vision. I would make all the issue’s meals. All of them. Challenge accepted!

I’ve been a fan of the American Test Kitchen since 2008. I was newly married, newly pregnant, newly moved to Rhode Island, and newly career-less. For years, I made recipes I’d committed to memory. My two kids were getting bored with the fare I provided. We ate out a lot too. I felt crunched for time and opted to not spend it learning new recipes. Then in 2008, with all the free-time I had, I wandered around my new community looking for a hobby.
I stumbled upon Cook’s Country October/November 2008 issue while out shopping in Newport. I was inspired. We were renting a home with an amateur-chef designed kitchen in Jamestown. It had a massive island and DCS natural gas range with 6 burners. I began acquiring “how-have-I-been-living-without-this” items from Williams-Sonoma. I started watching American Test Kitchen on my local PBS station. I was ready to pursue a hibernating passion. I baked, sautéed, braised, roasted, and simmered. I kept that Cook’s Country issue for years, and still make its Chicken Provençal.
I’ve done a lot of cooking for my family since the move to Rhode Island. We eat dinner at home as a family most nights, eating out maybe once a week. We’ve liked almost all the recipes I’ve made…except the butternut squash soup. I will never forget that. My family will never forget that. And the Guinness ice cream.
Magazine subscriptions, Pinterest, local foods, and friends have all been sources for new recipes. I’ve had a decent run as a home cook since upping my game in 2008. Still, Norway has presented me with some challenges. It is difficult and/or expensive to get some items. So, substitution and omission happens frequently.
As I read Milk Street’s charter issue, I decided I would be able to make all of the tested recipes. I would find all the ingredients and create the beautifully photographed food. I’d dazzle my family with the science behind the dishes, techniques, and tools.
I did it and here’s how.
Spanish Night
First up by Milk Street – Pinchos Morunos (Spanish Spice-Crusted Pork Tenderloin Bites). I took off with the tapas theme deciding to make prosciutto-wrapped asparagus and Sundried Tomato Polenta Bites as well.

Timing. Since I was making three dishes for our Spanish meal, I started with the Spanish spice rub and left the cubed pork to rest while I wrapped the asparagus stalks in prosciutto. I set those aside and focused my attention on making polenta for the Sundried Tomato Polenta Bites. I cut and fried the polenta rounds and left them to rest on paper towels per Recipe Girl’s (Lori Lange) directions.
With everything prepped and all other ingredients at the ready, I fired up the oven to 190 °C/375°F. Just as I began browning the pork in my skillet, the asparagus went in to the oven to roast. I flipped pork, checked on the asparagus, and assembled the polenta bites with the goat cheese, pesto, and sundried tomatoes. The pork finished a few minutes before the asparagus, so I turned the heat off and covered it till everything was ready to be placed on the table.
The pork was tender and well-seasoned. It would work with a myriad of sides. The asparagus and polenta bites were awfully delicious to not make again. We uncorked a bottle of Faustino I Gran Reserva 2004 given to us by our landlord for Christmas. It was a fun meal. We devoured it all.
Pasta Please
We look forward to Fridays. It took a while, but we say ‘no’ to most Friday night events. We’re happier for it. We’re usually tired. Kids are a bit cranky, but excited to stay up a little longer. Gemelli Pasta with Chevre, Arugula and Walnuts is a quick meal to throw together, leaving lots of time to relax in front of the fireplace and play board games.

Gemelli Pasta with Chevre, Arugula and Walnuts
Start to finish: 45 minutes. Servings: 4
Kosher salt
¾ lb gemelli pasta
4 oz chevre
5 Tbsp extra-virgin olive oil
Red pepper flakes
4 oz baby arugula (about 4 cups)
¾ cup walnuts, toasted and chopped
1/3 cup finely chopped fresh chives
• Bring a large pot of well-salted water to a boil. Add the pasta and cook until al dente. Meanwhile, in a medium bowl, combine the cheese, oil and ¼ tsp each of salt and red pepper flakes, stirring and mashing with a fork until smooth. Drain the pasta, reserving ¾ cup of the cooking water, then return the pasta to the pot.
• Add the arugula, goat cheese mixture and reserved pasta cooking water, then toss until the cheese mixture is evenly distributed and the arugula begins to wilt.
• Stir in the walnuts and chives, reserving a Tbsp of each for garnish, if desired, then season with salt and red pepper flakes. Transfer the pasta to a warmed serving bowl, then garnish with the remaining walnuts and chives.
Putting this meal together was a breeze. It also seemed faster than the advertised 45 minutes, but I forgot to time it. Boiling water, cooking pasta, toasting walnuts, mixing cheese, wilting arugula, and done. Served the pasta with a warm French baguette. Rave reviews from the full-bellied family.
Scrambled Eggs and Fried Chicken
On Saturday, my husband slept in and woke up just as I was rinsing the breakfast dishes. I don’t recall what I fed everyone. It was unusual that I fed anyone breakfast, but I had. So, we’d eaten. He had not and was hungry. At some point before this, he had read the Milk Street article on Fluffy Olive Oil Scrambled Eggs. He made them for himself on Saturday using 2 eggs.
He’s a bit of an egg lover. I’ve dubbed him ‘egg guy’ and ‘breakfast man.’ I make the coffee and get out of his way weekend mornings. He usually makes scrambled eggs with some cream cheese, smoked salmon, and chives. Bacon. Until recently, he was the only one in the house who could make an egg sunny side up. (I’m getting better).
While I didn’t get to try the eggs for myself, he really liked them. He commented, “You really need to have everything ready when you make eggs like this. It happens so fast. ‘Whoosh!'” (When I tried it days later, I got more sizzling then whooshing.)
He then announced he had a hankering for fried chicken. We couldn’t remember the last time we’d had fried chicken. I am afraid of all things fried. I will eat fried food, I just don’t want to be the one to fry it. It scares me. Hot oil. Splattering.
It was unanimously decided that my husband would oversee prepping and frying the chicken. I declared I oversaw sides and decided Milk Street’s Thai-Style Coleslaw with Mint and Cilantro was the one to make. Quick and easy. I chopped and chopped and chopped some more. I mixed far away from the frying happening on the cooktop. I even had time to enjoy a gin and tonic while he continued to avoid second-degree burns.
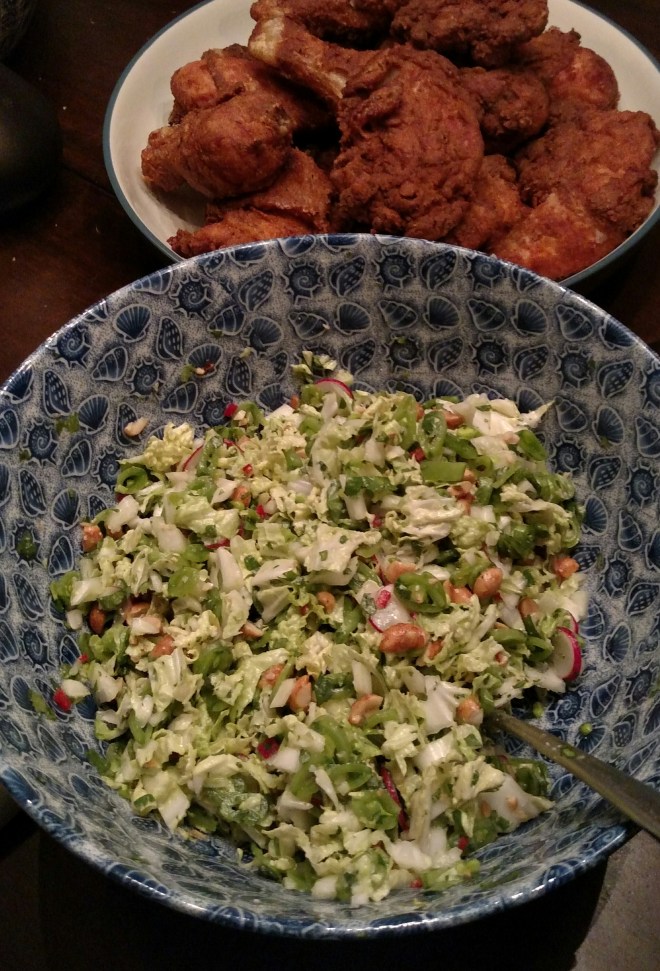
The coleslaw has wonderful flavors and is much, much lighter than traditional coleslaw. It worked very well with the heavy fried chicken. The five of us ate all six portions. Thankfully, we’d forgotten to invite a friend for dinner. We’d meant to, really. Without him there, we just ate and ate and ate. However, I didn’t walk away from the table feeling like the gluttonous pig that I was. I’m sure the coleslaw is the reason. De-light-ful.
Poaching and Pie Crust Chaos
Let me say up front, the Chinese White-Cooked Chicken with Ginger-Soy Dressing and the Brown Sugar Tart with Foolproof Pie Dough are delightful. The ordeal I experienced to enjoy these dishes was anything but; and I am mostly to blame.
I decided to make these dishes on a weekday. I wasted away my morning and flew into action making the pie dough at noon. I was getting a head start on dinner. Yay for me! What arrogance.
The dough was made and placed in the refrigerator until I returned hours later. I had anticipated I wouldn’t be home until 4pm. Still plenty of time to make a tart and poach a chicken. Yep. But then 4pm is when things slide quickly out of control if you’re distracted.
Distraction One: I have an induction cooktop

I’ve know this for a few months now. I discovered it the day we moved in. Almost all of my pots work on this cooktop. However, I had forgotten my stock pot was not one of those pots and spent 20 minutes trying to remedy the situation. I was going to poach this chicken. I couldn’t do it in my 4-quart pot. I needed to add almost 5 quarts of liquid along with a 3-pound chicken carcass. I refused to run out at buy an induction ready pot. I needed to use my stock pot.
I stood immobilized for quite some time eventually deciding to make a double boiler of sorts. I placed my All-Clad 6 Qt Stainless Sauté Pan on the cooktop with several cups of water and placed my Calphalon 8 Qt Stock Pot inside it. I added all the ingredients for the poaching broth and waited for the water in both pots to come to a boil. I’ll save you the suspense. It didn’t boil. The sauté pan was boiling like crazy, but the stock pot was just shaking from the boiling going on underneath it. It did get very hot though. At 5pm I decided to go ahead and slide the chicken in and increase the cook time from 40 minutes to an hour. I then rolled out the pie dough for the tart.
Distractions 2, 3, and 4: I have a phone, kids, and dogs
Phone calls and homework questions exasperated my drama at the stove. I was juggling multiple responsibilities here. My sister called. Good thing too. She agreed with my double boiler and extra cooking time method. The tart crust went into the oven and magically didn’t burn. Things burn when I’m distracted. It browned nicely. Got a call letting me know my snowshoeing trip the following day was cancelled due to bad weather. Spelling words were written. 6pm came. “Someone feed the dogs!” I yelled.
The chicken’s internal temperature was 78°C/172°F. I turned off the cooktop and let the chicken remain in its hot tub another 30 minutes. I got a wrong number from Wiesbaden. Book chapters were read. I whipped up the custard and put the tart in to bake. Pajamas were put on. I moved the chicken to the cutting board, started the rice, made the dressing, and chopped the cabbage. Math worksheets completed. Chicken was skinned and the meat removed. 645pm. Whew!


Was all the effort and stress worth it? Yes, it was. The chicken was juicy. The combination of sherry, shallots, ginger, vinegar, and sesame oil was scrumptious. My plate of cabbage, dressing, and flavorful rice was a great reward. The kids wanted the leftovers in their lunchboxes the next day! (There were leftovers, but I saved them for myself. The cabbage held up to a night in the fridge. Other than wishing I had a little extra dressing to drizzle on my cold chicken and rice salad, it was an appetizing lunch). Later, once the kids were in bed, I made a fire and slowly savored eat bite of my sweet and creamy slice of the Brown Sugar Tart. Alone.

Who Wants a Drink?
I am a wimp when it comes to food packing some heat. When a waiter asks if I want my dish 1, 2, 3, 4, or 5 stars, I say ‘zero’…maybe 1. What possessed me to try Milk Street’s Chili-Pineapple Margarita, you ask? Simple. It’s a margarita. I love them. I even throw Margaritaville parties just so I can drink them in my garden surrounded by plastic pink flamingos. The pineapple juice beckoned me, egging me on to try this. Fearing for my taste buds, I did doctor it a bit. There was just enough heat to notice and enough sweetness to drink them a little too quickly. We made these two nights in a row. I put my adaptions in parenthesis.
Chili-Pineapple Margarita
Start to finish: 1 hour and 30 minutes (20 minutes active). Servings: 2 (3)
1 cup plus 1 ½ tsp white sugar
1 cup water
Four 1-inch strips lime zest
Four 1-inch strips orange zest plus 1 orange wedge
1 jalapeno chili, halved (½ of the chili, deseeded)
1 habanero chili, halved (½ of the chili, deseeded)
1 Tbsp kosher salt (1½ tsp)
¾ tsp chili powder
4 oz tequila (8 oz)
2 oz pineapple juice (6 oz)
1 ½ oz lime juice (2 ½ oz/3 limes)
• In a small saucepan, combine 1 cup of the sugar, the water, both zests and both chilies. Bring to a boil, stirring occasionally, then remove from the heat and steep from 15 minutes. Strain into a jar, discarding the solids. Let cool.
• While the syrup cools, in a small bowl, stir together the salt, chili powder and remaining sugar. Spread the mixture on a small plate. Use the orange wedge to moisten the rims of 2 (3) rocks glasses, then dip in the chili salt, turning to coat.
• In a cocktail shaker, combine the tequila, pineapple juice, lime juice and 1 ½ oz of the chili syrup (3/4 cup tequila plus juice, ¼ cup syrup). Add 2 cups of ice cubes and sake vigorously, 10 to 15 seconds. Strain into the prepared glasses.

Preventing Scurvy
I love oranges. I am not worried about getting scurvy. I am a little worried about my Vitamin D levels here in Norway though. Regardless of my true motives, the Caramel Oranges are a delightful excuse to present a “beneficial” dessert to my family. It was wonderful. Beautiful presentation. Tasty. Refreshing. The directions are easy to follow. The scary bits about making caramel even had follow-along pictures!
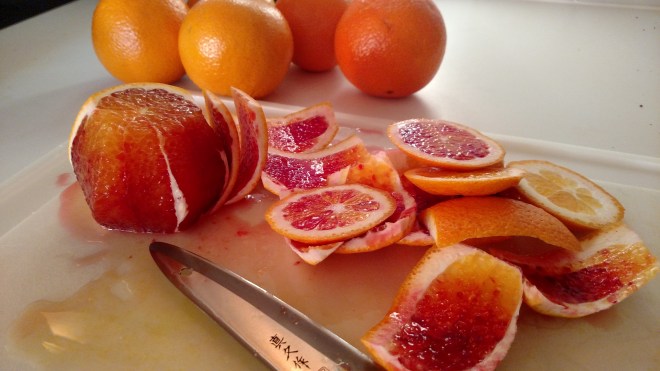


I served it on top of vanilla ice cream. It reminded my husband of an orange Creamsicle®. I recommend drinking all the left over caramel sauce right out of the 13×9 pan. (Make sure all the oranges have been consumed prior to doing this). That’s right. Just hold that casserole dish into the air and open wide. Yes, you can.
Milk Street for Breakfast, Lunch, & Dinner
I woke up feeling the need to accomplish something before I made coffee. I had already gotten the kids off to school and walked the dogs. (It was a good morning for us. Hair done without tears, little bellies full of hot breakfast, clean teeth, lunches made, no yelling, and at the bus stop before the bus arrived). I was doing well. I would make Rosemary-Pine Nut Cookies. I would make a half batch. I did this in case I didn’t end up liking them and because pine nuts are not cheap.
Rosemary-Pine Nut Cookies
Start to finish: 1 ½ hours (30 minutes active), plus cooling. Makes 24 bars
1 ½ cups all-purpose flour
½ cup fine cornmeal
½ white sugar
1 Tbsp finely chopped fresh rosemary
2 tsp grated orange zest
16 Tbsp salted butter, softened
1 cup pine nuts
3 Tbsp honey
• Heat the oven to 325°F with a rack in the lower-middle position. Line a 13-by-9-inch baking pan with foil, letting the edges hang over the long sides of the pan. In a bowl, combine the flour and cornmeal; set aside.
• In the bowl of a stand mixer fitted with the paddle attachment, combine the sugar, rosemary and orange zest. Mix on low until the sugar is moistened and begins to clump, 1 to 2 minutes. Add 14 Tbsp of the butter, increase to medium-high and beat until light and fluffy, 3 to 5 minutes, scraping down the bowl twice. Reduce to low and gradually add the flour mixture (this should take about 30 seconds). Scrape down the bowl and mix on low until the dough forms around the paddle, about 1 minute.
• Crumble the dough evenly over the bottom of the prepared pan. Coat the bottom of a dry measuring cup with cooking spray or oil, then use it to press the dough into an even layer. Sprinkle the pine nuts over the dough in a single layer and press down firmly.
• In a small bowl, microwave the remaining 2 Tbsp of butter until melted, about 30 seconds. Add the honey and stir until thoroughly combined. Brush the mixture over the bars, then bake until the top is deep golden brown, 40 to 45 minutes.
• Let the bars cool in the pan for 15 minutes. Using the foil, lift the bars from pan, transfer to a cutting board and cut into 24 pieces. Let the bars cool completely on a wire rack before serving. The cooled cookies can be stored in an airtight container at room temperature to up to 1 week.
I made some mistakes with this recipe. I accidentally added the sugar to the flour and cornmeal mixture. Since sugar is needed to cream with the rosemary and orange zest and butter, I ultimately used twice the amount of sugar the recipe called for. Oh, darn. I, also, missed the part about lining the dish with foil. This step is expertly designed to assist in the eventual removal of the cookie/bars from the dish so you may cut and consume them. I had almost conceded to eat the cookie/bars right out of the dish with a fork when I decided instead to cut them in the dish at the 15-minute cooling mark. Once cool, I began removing them from the dish individually with my mini spatula. Between 10am and 4pm I had eaten twelve 1-inch Rosemary-Pine Nut Cookies along with a whole pot of coffee. Breakfast and lunch served!


We all had one or two after school. Do some public math. This left us only 7 cookie/bars for dessert. I should have made a whole batch.
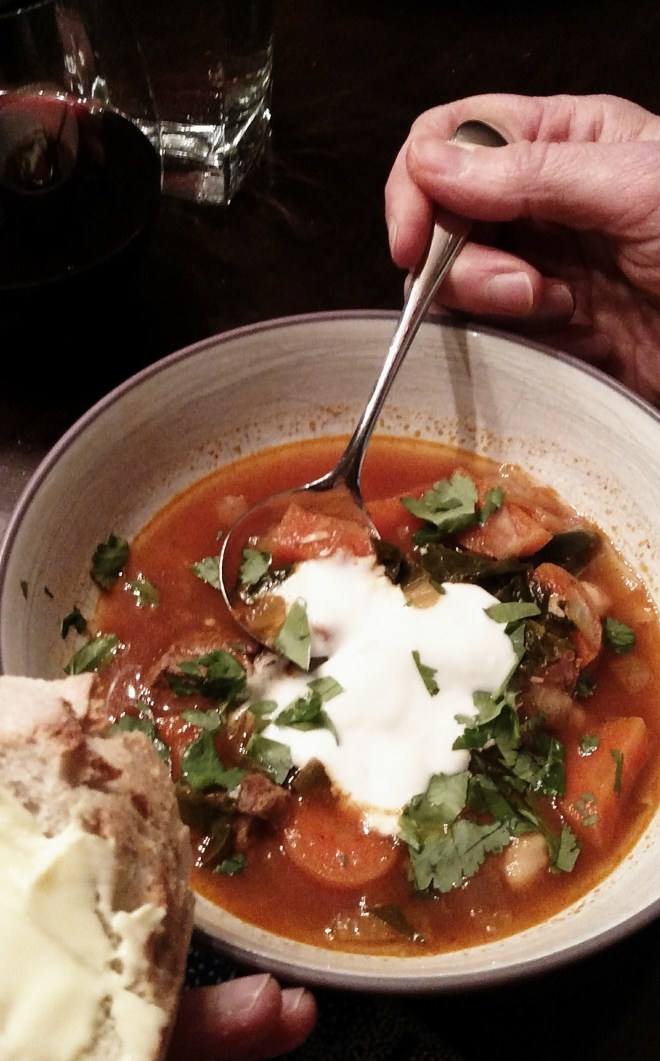
No-Sear Lamb (or Beef) and Chickpea Stew was served for dinner. Easy, easy, easy. I did all the prep and the first 3 steps before the kids got home. Finished it up while supervising the kids’ homework. I did cut a corner and did not peel the carrots. I wasn’t rushed, I’m just lazy like that. Also, I was (somehow) out of cumin powder, so I had to use cumin seeds crushing them a bit before adding them with the spice mixture. I really liked the flavor of the garlic head. Plus, I enjoyed seeing it bobbing upside-down in the stew.
This recipe could feed 6. I served it with yogurt and buttered French bread. I graciously (and regrettably) declined dessert leaving the few remaining Rosemary-Pine Nut Cookies to be divided among the four others at the table.
Carrots, Cake, and Chili Pepper Paste
French Carrot Salad just does not sound good to me. I put off making this for weeks. I could hear the carrots calling to me every time I opened the fridge. “You bought us. You should use us.” It’s not that I don’t like carrots. I like carrots. I eat them for snacks. I put them in stews. A carrot salad? Fine, Mr. Kimball. 2 servings. That’s it. I was surprised how much I did like it. It was lite and fresh. I don’t think I’ll be making the carrot salad for any upcoming potlucks, but I foresee making it along heavy main courses or along sandwiches.
French Carrot Salad
Start to finish: 20 minutes. Servings: 6
2 Tbsp white balsamic vinegar
2 Tbsp chopped fresh tarragon
1 Tbsp minced shallot
1 tsp honey
1/8 tsp cayenne pepper
Kosher salt
¼ cup extra-virgin olive oil
1 ¼ pounds carrots, peeled and shredded
1 cup chopped fresh parsley
• In a large bowl, whisk together the vinegar, tarragon, shallot, honey, cayenne and 1 teaspoon of salt. Let sit for 10 minutes. Whisk in the oil until emulsified, then add the carrots and parsley. Stir until evenly coated. Season with salt and cayenne pepper. Serve or refrigerate for up to 24 hours.
Chocolate-Prune-Rum Cake sounds sticky and sweet and boozy. Perfect. I planned to make half of the recipe. I am the one who ends up eating the sweets in the house so I need to be protected from my lack of self-control.
I put the ingredients on the counter and could not find chocolate. I had used it all or it is hiding very, very well. I really thought I was ready to make this. I had recently solved my prune dilemma. I came across individually wrapped prunes. I couldn’t handle all that packaging for environmental reasons and went with canned prunes. I did not know that was an option, but there they were.
Chocolate was procured and the baking began. Having more time to think about this cake, I wanted to make it as written. No half-attempts here. I’m part of a running and hiking group now. Bring on the whole cake!

Ensure your spring-form pan is well-sealed/secured or place a tray beneath it. Mine leaked setting off the smoke detector and alerting the alarm company.
I served the cake after it had cooled for almost 2 hours. It was…okay. Not too sweet. I just didn’t really like the texture. It was kind of soggy-spongy. It was much better in the morning after a night in the fridge. Cold, the consistency was closer to the other flour-less chocolate cakes I’ve made. It didn’t last long after that.
Towards the back of the magazine is a recipe for Harissa. I made it for my Sriracha-loving teenager. Maybe it was the dried peppers I used (I couldn’t find any labeled New Mexico Chilies), but I can easily handle this paste without mixing it with yogurt or mayonnaise. I tastes great with sweet potato fries and tater tots. I did not add any cayenne pepper. This certainly helped control the heat. I thought I’d let my son add it as he determined necessary. He says it tastes ‘really nice.’ Teenagers. I have decided not to give it all to him. The whole family wants some.
Harissa
Start to finish: 15 minutes. Makes about 1 ½ cups
4 dried New Mexico chilies, stemmed, seeded and torn into rough pieces
½ cup neutral oil
6 large garlic cloves
1 tsp caraway seeds
1 tsp cumin seeds
1 cup drained roasted red peppers, patted dry
½ cup drained oil-packed sun-dried tomatoes, patted dry
1 Tbsp white balsamic vinegar
Kosher salt
Cayenne pepper
• In a small saucepan over medium heat, combine the chilies, oil, garlic, caraway and cumin. Cook, stirring often, until the garlic is light golden brown and the chilies are fragrant, about 5 minutes. Carefully transfer the mixture to a food processor and add the red peppers, tomatoes, vinegar and ¾ tsp of salt. Process until smooth, about 3 minutes, scrapping down the bowl once or twice. Season with salt and cayenne to taste. Serve immediately or refrigerate in an airtight container for up to 3 weeks.
One Last Supper
Our final Milk Street meal was Skillet Packet Salmon with Chermoula Sauce and Avocado Salad with Pickled Mustard Seeds and Marjoram Vinaigrette. I think they work beautifully together. Salmon is one of our favorite dinners and this was another quick, effortless way to cook it.
What can I say about avocados that hasn’t already been said? They are an item I buy each week regardless of price. They remind me of our five years in San Diego. It will be a long time before I can once again buy 20 avocados for $5 on the side of the road. For now, I pay A LOT, I’m sure. The price is listed in Norwegian kroner. I don’t convert it to dollars. I just can’t.
The vinaigrette’s list of ingredients is daunting. Fear not! It’s yummy even with substitutions and omissions, and I made quite a few. I grabbed black mustard seeds from the grocery. The recipe calls for yellow mustard seeds. No matter. Persevere. Coriander powder instead of seeds. Allspice powder instead of berries. Deli mustard instead of whole-grain. There was a complete absence of shallots, fresh marjoram, and ricotta salata cheese, (and onion, oregano, and Parmesan, for that matter).

Avocado Salad with Pickled Mustard Seeds and Marjoram Vinaigrette
Start to finish: 1 hour. Servings: 6
For the pickled mustard seeds:
¼ cup yellow mustard seeds
½ cup cider vinegar
¼ cup white sugar
¼ cup water
1 ½ tsp black peppercorns
½ tsp coriander seeds
3 allspice berries
1 bay leaf
1/8 tsp red pepper flakes
For the dressing:
2 Tbsp pickled mustard seeds and brine
1 Tbsp minced shallot
2 tsp whole-grain mustard
1 tsp honey
¼ tsp kosher salt
¼ tsp ground black pepper
¼ cup chopped fresh marjoram
3 Tbsp canola oil
3 Tbsp extra-virgin olive oil
To finish:
3 firm but ripe avocados
Kosher salt
6 tsp lemon juice
Thinly sliced ricotta salata cheese
Fresh marjoram leaves
• To make the pickled mustard seeds, in a small saucepan over high heat, combine the mustard seeds and enough water to cover them by 2 inches. Bring to a boil, then reduce the heat to medium-low and simmer until the seeds are tender, about 8 minutes. Strain the seeds through a mesh strainer and transfer to a bowl. Wipe out and reserve the pan.
• To the pan, add the vinegar, sugar, water, peppercorns, coriander, allspice, bay leaf and pepper flakes, then place over high heat. Bring to a boil, then reduce the heat to medium-low and simmer until the spices are fragrant and the sugar has dissolved, 3 to 5 minutes. Strain the hot brine over the mustard seeds, discarding the solids, and let the mixture cool to room temperature. Use immediately or cover and refrigerate for up to 4 weeks.
• To make the dressing, in a small bowl mix together 2 Tbsp of the pickled mustard seeds and brine, the shallot, mustard, honey, salt and pepper. Let sit for 10 minutes. Add the marjoram and both oils and whisk until emulsified.
• To assemble and serve, slice the avocados in half lengthwise, remove the pits, then peel the halves out of their skins. Place the avocado halves cut side down. Starting at the larger end of each half, cut each into 6 lengthwise slices, leaving the top 1 inch of the avocado intact. Arrange the avocado halves on a serving platter or individual plates, cut side down, and gently press to fan the slices. Sprinkle a pinch of salt and 1 tsp of lemon juice over each half. Spoon the dressing over the avocados and garnish with ricotta salata and marjoram leaves.
I went on to make the chermoula sauce. Piece of cake. Food processors are awesome. The salmon was easy too. Dry, salt and pepper. Create a foil pocket to steam the fish in. Brilliant. My husband does a similar method on fishing trips, apparently. Any who…oh, this method is fast too. Luckily, everything else was prepped and ready to go on the table. 7 minutes. Done.
Chermoula Sauce
Start to finish: 10 minutes. Makes enough to top 4 salmon fillets
1 cup lightly packed flat-leaf parsley leaves
2 Tbsp pine nuts, toasted
2 tsp grated lemon zest
1 large garlic clove
1 tsp ground coriander
1 tsp sweet paprika
½ tsp kosher salt
½ tsp ground cardamom
¼ tsp red pepper flakes (optional)
3 Tbsp extra-virgin olive oil
• In a food processor, combine all ingredients but the olive oil. Process until foinely ground, about 20 seconds. Scrape down the bowl, add the oil, then process until incorporated, about 10 seconds.
Skillet Packet Salmon
Start to finish: 50 minutes (10 minutes active). Servings: 4
Four 6-oz center-cut skinless salmon fillets
Kosher salt and ground black pepper
1 tsp extra-virgin olive oil
Chermoula sauce to serve
Lemon wedges, to serve
• Remove the salmon from the refrigerator and let sit at room temperature for 20 to 30 minutes.
• Pat the salmon dry with paper towels and season the fillets all over with salt and pepper. Place a 12-by-24-inch sheet of foil on the counter shiny side down. Fold in half to form a 12-inch square. Unfold the foil and drizzle the oil evenly over half of the foil (one of the 12-inch squares), leaving a 3-inch border.
• Arrange the salmon fillets over the oiled area, leaving at least ½ inch between them. Fold the top square of foil over the salmon and, without pressing down on the fillets, roll and crimp the open sides to create an airtight packet. Fold in the corners of the packet to help it fit in the pan.
• Heat a 12-inch skillet over high heat for 5 minutes. Carefully place the packet in the skillet and cook 5 minutes for medium and 6 minutes for medium-well, rotating the pan frequently to ensure even cooking. The packet should being puffing after 2 minutes and be fully inflated after 4 minutes. If the bottom edges of the packet start lifting up, reduce the heat slightly.
• Using tongs, slide the packet onto a platter and let site for 1 minutes. Carefully open the packet. Spoon the accumulated juices over the salmon. Serve topped with chermoula and lemon wedges.
It looks great on a plate. Pink salmon with the greens and yellows. Beautiful. The combination of flavors was very pleasant. The citrus on both dishes pulled them together. It was gone in minutes. Everyone wanted more. I should have made more.
Wrapping Up
I’m not a fan of couscous. Israeli couscous, yes. Couscous, no. So, the Herb and Pistachio Couscous Salad is not happening. I gave up looking for chard for the Hot Oil-Flashed Chard with Ginger, Scallions, and Chili after visiting two groceries. I’ll keep looking for chard. I may try this recipe with kale though. And while, I love Brussels sprouts, my cast iron skillet won’t work on my induction cooktop. So, I won’t be able to make and enjoy Charred Brussels Sprouts. I’ll just have to keep roasting them in my oven.
Overall, the Milk Street recipes were very, very good. I didn’t find any to be arduous. Some of the ingredients were new to me – mustard seeds, white balsamic vinegar, and Napa cabbage. I’m glad I didn’t let my lack of skill, appliances, and ingredients keep me from attempting so many of these pleasant concoctions. I think it is safe to say that with Milk Street we will continue to see the same level of science-based techniques, equipment recommendations, and flavorful recipes on which Christopher Kimball’s reputation is built. The magazine has an appealing presentation with lots of photos, no advertisements, and explanations on why things were done and why ingredients were selected. I am excited about the upcoming issues of the magazine and look forward to serving many more Milk Street meals.
I suggest finding a copy of the charter issue and ordering a subscription.
